
A custom concrete pool isn’t just a backyard addition; it’s a structural legacy designed to outlast the home it accompanies. You’ve likely felt the weight of this investment, perhaps worrying about construction timelines or the technical differences between gunite and shotcrete. It’s natural to feel a bit of anxiety over long-term structural integrity when you’re planning a permanent aquatic retreat. We believe that a high-end build should offer peace of mind alongside its aesthetic beauty.
We understand that you want more than just a swimming area; you want a seamless transition from raw earth to a bespoke backyard oasis. This guide provides a masterclass in the concrete pool construction process, transforming common project confusion into the confidence needed to build a 50 year masterpiece. We’ll outline a clear roadmap of the construction phases, explaining how our 75 years of multi-generational expertise ensures every detail is handled with care. You’ll discover how luxury features like infinity edges and natural waterfalls are integrated into the engineering. From the first scoop of soil to the final tile placement, we’re here to guide you through every stage of this rewarding journey.
Key Takeaways
- Learn how architectural 3D modeling and site engineering ensure your pool’s aesthetic vision aligns perfectly with structural requirements.
- Gain a clear understanding of the concrete pool construction process, from the precision of the rough dig to the application of a monolithic shell.
- Discover the technical differences between gunite and shotcrete to help you select the most durable application method for your custom design.
- Understand the critical role of waterproofing membranes and meticulous tile work in protecting your high-end investment from moisture migration.
- Master the “Big Fill” and initial water chemistry protocols to safeguard your new finish and ensure a 50 year legacy of enjoyment.
Phase 1: Architectural Design and Site Engineering
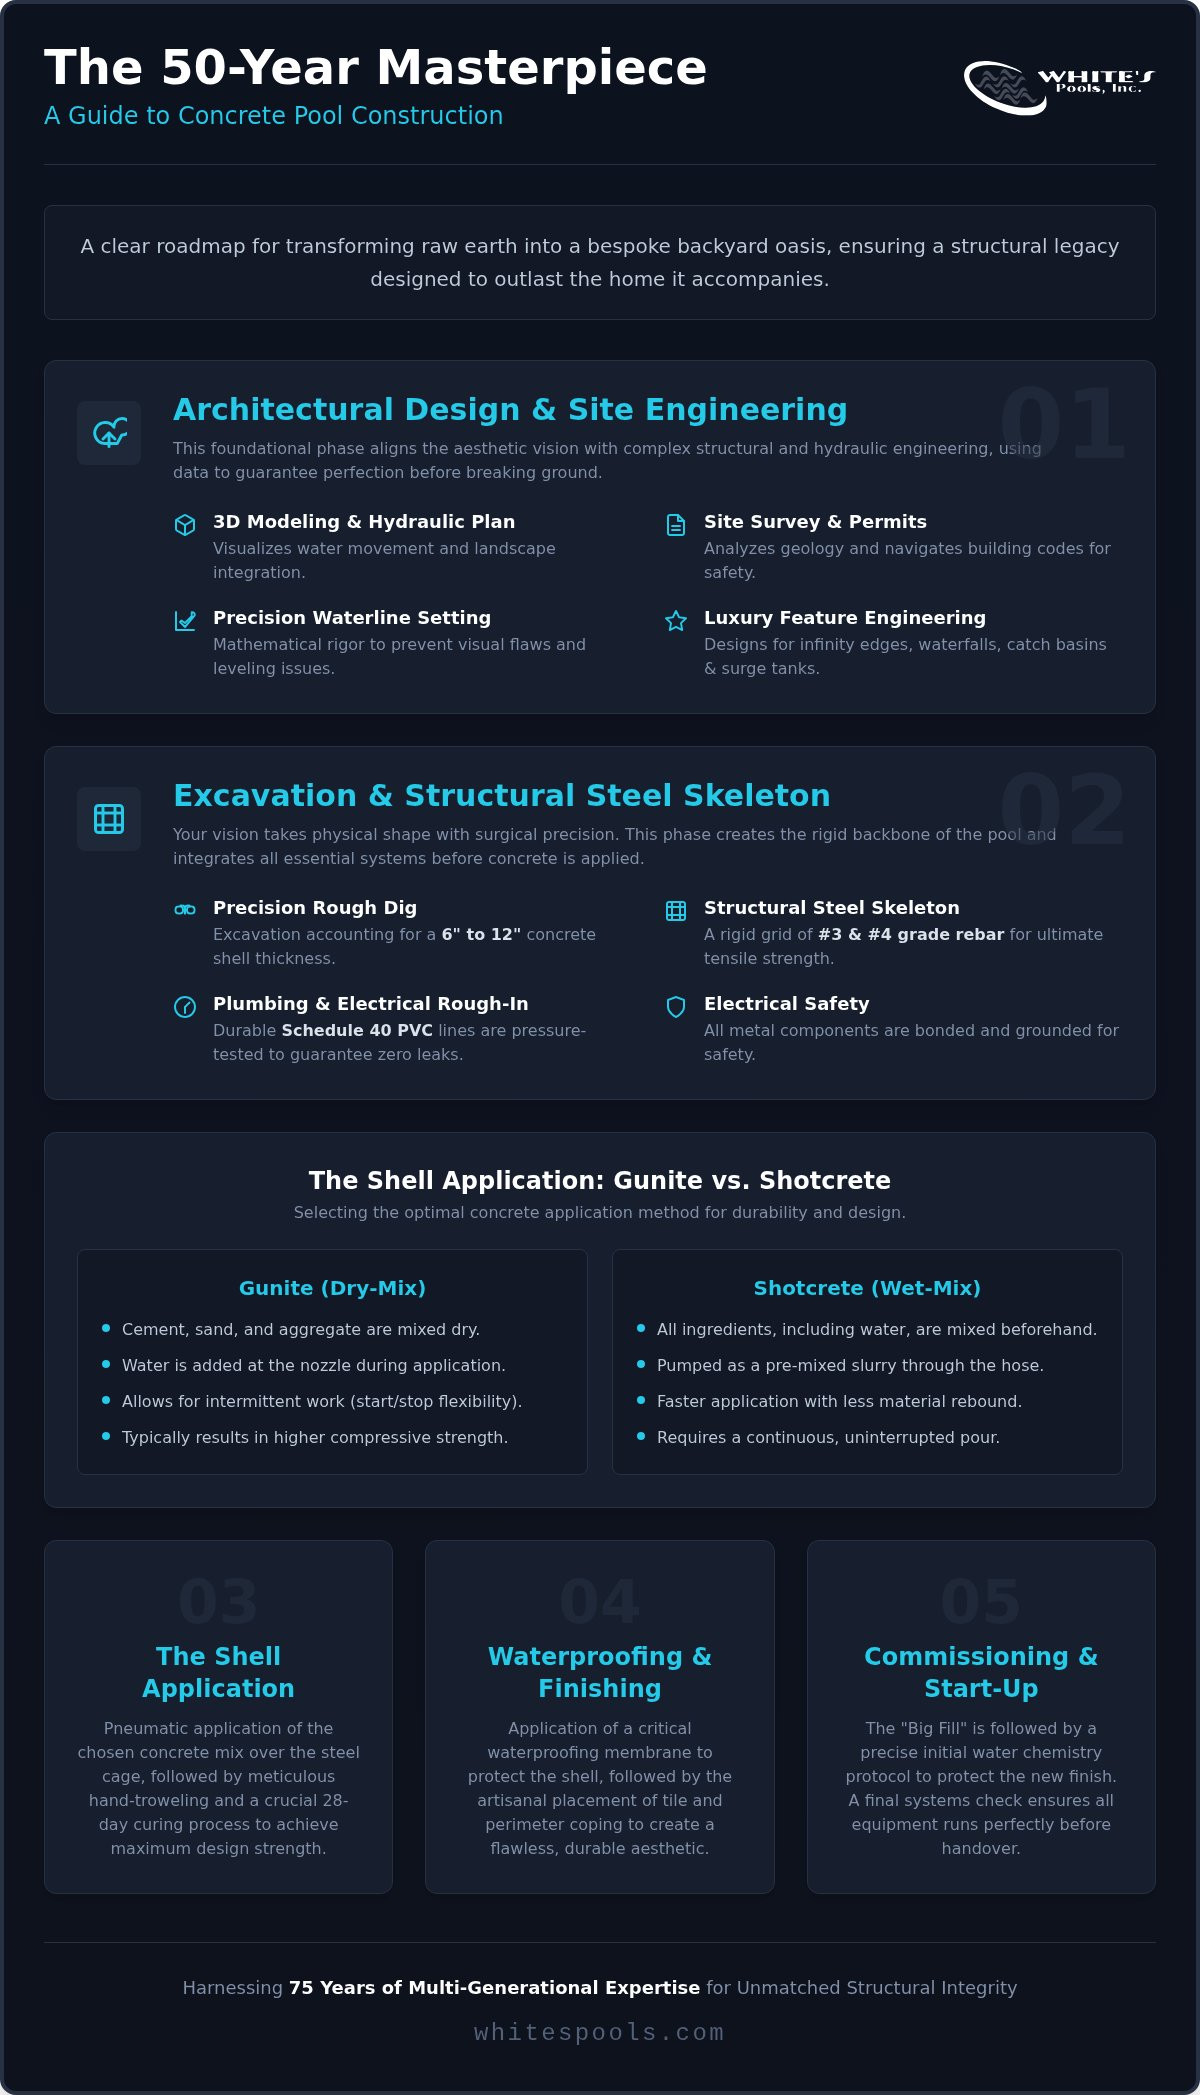
Every enduring masterpiece begins with a solid foundation. In the world of high-end aquatic design, that foundation isn’t just concrete; it’s data. Before the first shovel hits the dirt, we conduct a comprehensive site survey and soil analysis. This step is non-negotiable. Local geology dictates how we engineer the pool shell to prevent shifting or cracking over its 50 year lifespan. We use advanced 3D modeling to ensure your aesthetic vision aligns perfectly with the complex hydraulic engineering required for a modern swimming pool. This modeling allows us to visualize how water moves and how the structure integrates with your existing landscape.
Securing structural permits is the next critical hurdle. We navigate national building codes to ensure your permanent structure meets every safety and durability standard. A key part of this engineering is defining the “Waterline.” This is a precision measurement. If the waterline is off by even a fraction of an inch, the entire visual effect is ruined. Leveling issues can plague a project for years if this isn’t handled correctly. Getting the concrete pool construction process right starts with this level of mathematical rigor.
Custom Features and Hydraulic Planning
Luxury elements like infinity edges require more than just a “vanishing” look. They demand sophisticated engineering to maintain the illusion of a glass-like surface. Our planning includes:
- Catch Basins: Hidden reservoirs that capture water spilling over the edge.
- Surge Tanks: Systems that manage water displacement when multiple swimmers enter the pool.
- Weight Distribution: Reinforced steel skeletons designed to support the massive load of natural waterfalls.
We prioritize plumbing efficiency by maximizing Gallons Per Minute (GPM). This ensures your luxury features perform with a powerful, steady flow while maintaining energy efficiency. It’s about balancing the art of the design with the hard science of water movement.
Layout and Stake-Out
The transition from a 2D blueprint to your physical backyard is a moment of transformation. During the “Forming” stage, our team uses wood forms and string lines to set the initial perimeter. We verify every setback and utility clearance with meticulous care. This phase creates a physical outline of your dream. It allows you to walk the perimeter and feel the scale of the project before excavation begins. This is the final check to ensure the placement is perfect relative to your home and sun exposure.
Phase 2: Excavation and the Structural Steel Skeleton
Excavation is the moment your vision begins to take physical shape. It’s a phase of high energy and heavy machinery, but it requires surgical precision. Our teams perform a “Rough Dig” that accounts for a shell thickness of 6 to 12 inches. This ensures your final pool matches the exact dimensions of your 3D design. After the machines finish, we hand-contour the floor and walls to mirror your architectural specs. This meticulous approach is part of what makes the concrete pool construction process so reliable for long-term use.
Following the dig, we weave a complex rebar grid. We use #3 and #4 grade steel bars to create a rigid backbone for the entire structure. This step is vital for meeting industry standards for concrete strength and longevity. We also perform bonding and grounding at this stage. This connects all metal parts to a common ground, ensuring your pool remains electrically safe for your family. Our 75 years of experience means we never cut corners on these invisible but essential safety measures.
The Science of the Steel Cage
A steel cage only works if it’s placed correctly. We use “chairs” to suspend the rebar, ensuring it stays in the center of the concrete pour rather than sinking into the dirt. We add extra reinforcement for deep ends and high-stress points where the water pressure is greatest. The steel cage provides the necessary reinforcement that allows the finished concrete shell to withstand tensile stress and resist cracking. If you’re planning a complex layout, our custom concrete pools are designed to provide this level of structural permanence.
Plumbing and Electrical Rough-In
Before the concrete arrives, we install the veins and arteries of the system. We use Schedule 40 PVC for all plumbing to ensure it stands up to decades of use. Every line is pressure-tested to guarantee zero leaks before the shell is applied. We also set the main drains and return inlets to ensure optimal circulation throughout the pool. This careful rough-in is a foundational step in the concrete pool construction process, ensuring your water stays clear and your equipment runs efficiently. We treat your plumbing with the same engineering rigor as the shell itself.
Phase 3: The Shell Application: Gunite vs. Shotcrete
The transformation from a steel skeleton to a solid structure happens during the shell application. This is a high-velocity, pneumatic process where concrete is “shot” onto the rebar at incredible speeds. This technique creates a seamless, monolithic shell that’s far stronger than traditional poured concrete. During this single, intensive session, our craftsmen build the walls, floor, steps, and benches simultaneously. This ensures there are no “cold joints” or weak points where the concrete might separate. It’s a defining moment in the concrete pool construction process that establishes the pool’s lifelong durability.
We choose between two primary methods based on your specific design and site requirements. Both techniques must adhere to strict American Shotcrete Association pool construction standards to ensure the vessel can withstand decades of water pressure. While the application is fast, the chemistry is slow. A concrete shell requires a full 28-day hydration period to reach its maximum PSI strength. This phase demands patience, but it’s the secret to a pool that lasts over 50 years. For a deeper look at how these techniques fit into the broader timeline, our comprehensive guide to new pool construction walks through every stage of the build in detail.
Gunite vs. Shotcrete: A Technical Comparison
Gunite uses a dry-mix process where water is added at the nozzle, allowing the operator to adjust the consistency on the fly. This is ideal for complex, custom shapes. Shotcrete arrives pre-mixed from a truck, ensuring a highly consistent blend that’s perfect for larger, more straightforward projects. Both methods produce an elite-tier finish when handled by experts.
| Feature | Gunite (Dry Mix) | Shotcrete (Wet Mix) |
|---|---|---|
| Typical Strength | 4,000 – 8,000 PSI | 4,000 – 6,000 PSI |
| Application Speed | Moderate | Fast |
| Best Use Case | Complex custom designs | Large-scale or standard builds |
The Importance of Proper Curing
Curing is where many builders rush, but our family-owned approach prioritizes long-term integrity. You’ll play a vital role here. We ask homeowners to water the shell twice daily for the first seven days. This moisture slows the drying process, preventing “check cracks” and ensuring a deep chemical bond. Temperature and humidity play huge roles in how the concrete matures. If it dries too fast, it becomes brittle. By keeping the shell damp, you’re helping the concrete reach its full structural potential, creating a rock-solid foundation for the tiles and finishes to follow.
Phase 4: Waterproofing, Tile, and Perimeter Coping
Once the shell has fully cured, we move from the heavy engineering of the structure to the artistry of the finish. This stage of the concrete pool construction process begins with an invisible but vital layer: the waterproofing membrane. We apply this specialized coating to the entire interior of the shell. It acts as a secondary shield against moisture migration, ensuring that water stays inside the vessel and doesn’t seep into the surrounding soil. This protection is a hallmark of a professional build and prevents mineral deposits from marring your tile work later.
Next, we install the waterline tile. While it adds a beautiful decorative band, its primary job is to make maintenance easy. Calcium and oils naturally collect at the water’s edge; tile provides a non-porous surface that wipes clean. Around the perimeter, we set the “coping.” This is the cap on the pool wall that provides a finished edge and a safe place for swimmers to grip. You can choose from natural stones like travertine or flagstone, or perhaps a sleek pre-cast concrete for a modern look. We ensure the coping integrates perfectly with your pool deck, creating a smooth transition to your outdoor living space.
Luxury Tile and Coping Selections
The details you choose define the luxury of the final build. Glass mosaic tiles offer a high-end shimmer that reflects sunlight, while traditional ceramic provides a classic, grounded feel. The profile of your coping also matters for both safety and style:
- Bullnose Coping: A rounded edge that offers a soft, traditional look and comfortable grip.
- Cantilever Coping: A modern, squared-off edge that extends slightly over the water for a sleek profile.
- Natural Stone: Using materials like Travertine creates a seamless, organic transition to the surrounding landscape.
The Interior Finish: Plaster, Pebble, or Quartz
The final interior layer determines the water’s color and the texture underfoot. Standard white plaster remains a classic choice for a smooth, sky-blue water appearance. For those seeking more durability and a natural lagoon feel, pebble finishes offer incredible longevity and a slip-resistant texture. Quartz aggregates are another premium option, adding a subtle sparkle to the water and providing increased stain resistance. If you’re ready to select the premium materials that will define your backyard, explore our pool tiles and finish options today.
Phase 5: Commissioning, Start-Up, and Long-Term Care
The construction crew has packed up, the equipment is wired, and the site is clean. Now comes the most rewarding moment of the concrete pool construction process: the “Big Fill.” This final act requires a bit of discipline. You must keep the water running continuously until it reaches the midpoint of your waterline tile. Stopping the flow early can leave a permanent “bathtub ring” on your pristine new finish, a mark that’s nearly impossible to remove. This is the moment your backyard officially transforms into a functional aquatic sanctuary.
Once the pool is full, we begin the delicate dance of initial water chemistry. New concrete is chemically active and will naturally drive the pH and Alkalinity levels upward during its first few weeks of life. We guide you through the balancing process to ensure the water doesn’t etch or scale your new interior finish. We also conduct a comprehensive equipment orientation. We’ll walk you through the operation of your pumps, filters, and heaters, ensuring you feel completely in control of your new investment. Our goal is to hand over the keys to a system you understand and trust.
The First 30 Days of Pool Life
The first month is a critical period for the longevity of your pool’s interior. You’ll need to brush the entire surface twice daily during the first week. This simple task prevents plaster dust from hardening onto the finish, keeping the surface smooth and vibrant. We also delay the start of salt chlorination systems for at least 30 days. Adding salt too early can interfere with the final curing of the plaster and lead to staining. During this time, we monitor the filter closely to handle the initial fine debris and dust that naturally occurs after such a major project.
Beyond Construction: Maintenance and Longevity
A custom concrete pool is built to last for generations, but its lifespan depends on consistent care. While the structure is engineered for 50 or even 75 years of service, the mechanical components and water chemistry require professional attention. Regular cleaning and chemical balancing protect your equipment from premature wear and keep the water safe for your family. Seasonal maintenance is also vital. Whether it’s winterizing the system in colder months or performing a thorough spring opening, these steps prevent freeze damage and structural stress. To ensure your backyard oasis remains in peak condition, explore our professional pool maintenance plans designed to protect your luxury investment for the long haul.
Build Your Backyard Legacy
Designing a custom concrete pool is a journey that blends structural permanence with high-end artistry. You’ve seen how every step, from the initial 3D modeling to the final water chemistry balance, contributes to a vessel built for a 50 year lifespan. Understanding the concrete pool construction process empowers you to make informed decisions about your property. You can now distinguish between gunite and shotcrete or choose the perfect coping to match your outdoor living space with absolute confidence.
We’ve spent over 75 years perfecting these engineering techniques. As a 3rd generation family-owned enterprise, we specialize in high-end residential builds like luxury infinity edges and indoor retreats. Our commitment to quality ensures your investment is in safe, experienced hands from the first dig to the first swim. It’s time to turn your vision into a structural reality. Start your custom pool journey with White’s Pools today. We look forward to building a masterpiece that your family will cherish for decades to come.
Frequently Asked Questions
How long does the concrete pool construction process actually take?
The construction phase for a standard project typically takes between 8 and 12 weeks once the ground is broken. However, the total concrete pool construction process can span several months when you account for the initial 3D design phase and the 2 to 8 weeks often required for municipal permitting. Complex features like infinity edges or integrated outdoor fireplaces may also influence the timeline, but we prioritize a methodical pace to ensure structural excellence.
Can I build a concrete pool in a small backyard or sloped lot?
Concrete is the premier choice for challenging terrains because it’s built entirely on-site. Unlike pre-cast fiberglass shells that require specific access and flat ground, a custom concrete structure can be engineered to act as a retaining wall on a sloped lot. We specialize in maximizing limited space with plunge pools or creating dramatic infinity edges that utilize the natural elevation of your property. This flexibility allows us to transform almost any backyard into a bespoke retreat. For those who want to ensure their entire property’s infrastructure is built with this level of expertise, you can learn more about Born Integrated Construction and their professional paving and slab services.
What is the difference between gunite and shotcrete in pool construction?
The primary difference lies in the mixing process used to create the shell. Gunite is a “dry-mix” where the concrete and sand are mixed with water at the nozzle, allowing for precision control during the application. Shotcrete is a “wet-mix” that arrives pre-blended from a truck. Both methods create a high-strength, monolithic shell when applied by experts. We select the method that best suits your design’s complexity and the specific structural requirements of your site.
How much noise and disruption should I expect during the dig?
Excavation is the most disruptive phase, involving heavy machinery like backhoes and dump trucks. This stage typically lasts between one and three days depending on soil conditions and pool size. You should expect significant noise and some vibration during these working hours. While the yard will look like a construction site for several weeks, we maintain a clean and organized workspace to minimize the impact on your daily life and keep your neighbors comfortable.
Why is concrete considered better than fiberglass for custom designs?
Concrete offers limitless customization that fiberglass simply cannot match. While fiberglass is restricted to pre-made factory molds, a concrete build is a blank canvas. You can specify the exact depth, shape, and size of your pool to fit your lifestyle. This versatility allows for the integration of luxury features such as tanning ledges, natural waterfalls, and sports courts into a cohesive master plan. Furthermore, concrete’s structural integrity leads to a much longer lifespan, though any existing concrete on your property that shows signs of shifting should be addressed by specialists like Foundation Werks to maintain the overall quality of your outdoor living space.
Starting your project in the fall or winter is often the most strategic choice for homeowners. This timeline allows ample room for the permitting and concrete pool construction process to conclude before the peak swimming season begins. Building during the off-season also means your landscaping has time to recover and mature by spring. While we build year-round, starting early ensures you don’t lose a single day of summer enjoyment once the warmer weather arrives.
How often does a concrete pool need to be resurfaced?
A high-quality concrete pool typically requires resurfacing every 10 to 15 years. This timeline depends heavily on how well the water chemistry is maintained and the type of finish you choose. Standard plaster may need attention sooner, while premium pebble or quartz finishes are known for their exceptional durability and stain resistance. Regular professional cleaning and chemical balancing are the best ways to extend the life of your interior finish and protect your long-term investment.
Does building a concrete pool add significant value to my home?
A professionally designed concrete pool is a significant asset that enhances both your lifestyle and your property’s resale appeal. In many luxury markets, a custom aquatic retreat is considered a standard expectation for high-end homes. Beyond the financial return, the addition of integrated features like outdoor fireplaces or professional tennis courts creates a comprehensive outdoor living experience. It transforms your property into a permanent destination, providing a “staycation” value that is difficult to quantify but deeply felt.

